
During the mid-20th century, popcorn ceilings were all the rage, especially in bedrooms. This rough, streaked texture was widely used in new homes from the 1950s through to the 1980s for its unique sound-dampening capabilities and its knack for concealing ceiling flaws. However, these textured ceilings can darken a room due to their lack of light reflectivity and are often considered aesthetically displeasing by many homeowners.
Luckily, removing the popcorn texture isn’t as daunting as it seems, albeit a bit messy and labor-intensive. Yet, the enhanced appearance and brighter ambiance of your room after renovation will be well worth the effort.
Step 1: Preparations and Precautions
Before diving into the project, make sure to get the popcorn ceiling tested by an EPA-approved laboratory. If your home was constructed before 1982, there’s a chance the ceiling texture might contain asbestos. If asbestos is detected, it’s safer to hire a licensed professional adept in handling hazardous substances. If the texture is asbestos-free, feel free to proceed with the removal yourself. However, remember to turn off the electricity in the room before starting, as this is a water-based procedure.
Step 2: Protect and Prep the Room
Understand that removing a popcorn ceiling is a messy affair. Nonetheless, proper preparation can significantly reduce the post-project cleanup. Start by removing all the furniture and cover the room’s floor and the lower portion of the walls (approximately 16 inches up) with heavy-duty plastic sheeting, securing it with masking tape.
Don’t forget to protect the upper walls as well. Tape around the room’s perimeter, slightly below the ceiling, and secure it with additional tape. You may need to remove any ceiling fixtures such as fans, molding, or hanging lights to ensure a smoother process.
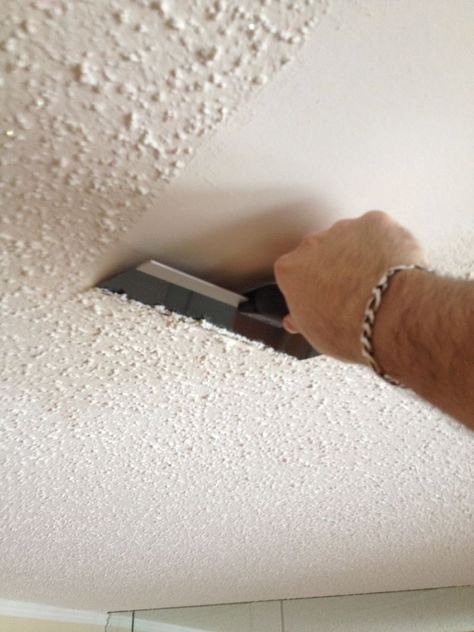
Step 3: Spray, Wait, Scrape
Break the ceiling down into manageable 4-foot-square sections. Using a garden sprayer, drench the first section thoroughly and let it soak for about 10-15 minutes. Don your safety gear – a dust mask and glasses – then get up on a ladder to reach the dampened area. Holding the putty knife at a 30° angle to the ceiling, start scraping off the popcorn texture. Keep this cycle of spray, wait, and scrape, working one section at a time until you’ve covered the whole room.
Step 4: Prime, Paint, and Finish Up
Continue Reading in next page
