
Popcorn Preparation: First pop the corn kernels using any preferred method. You can utilize air popper, stove-top popcorn maker or microwave as per your choice.
Caramel Making Process: In a large pot on medium heat, melt butter; add sugar and stir until the sugar dissolves and becomes golden brown.
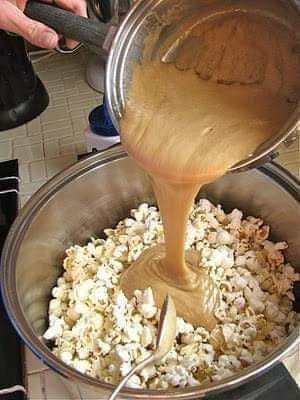
Mixing Popcorn And Caramel Sauce: When the caramel sauce is ready, drizzle it over popped popcorn and mix up so that each kernel is well-coated. Spread the caramelized popcorn on baking sheet to cool down and harden.
Hints for Success
Fresh popcorn kernels have stronger flavor and better texture.
Ensure not to overcook the sauce for it not to burn
For even coatings stir gently while mixing popcorns in caramel sauce
Allow all caramels to reset before serving completely cold
Variations and Additions
Take a leap with your caramel snack. Assume unusual toppings and extensions on your homemade caramel corn recipe:
Nuts: For extra crispy pieces, you may include such nuts as broken peanuts, almonds or cashews.
Chocolate: Try adding melted chocolate over the top of the caramel corns for an indulgent feel.
Seasonings: There are various spices that can be used to season caramel corn like cinnamon, nutmeg or chili powder which give rise to unique flavor profiles.
Storage Tips
For up to two weeks, keep homemade caramel corn in an airtight container at room temperature. You can also freeze it for up to three months in a freezer-safe container if you want it to last longer.
Serving Suggestions
A popular way of serving homemade caramel corn is as snacks at parties, movie nights or simply as treats during family gatherings. This can be gifted as holiday goodies by packing them in fancy bags and containers.
Health Benefits (if any)
As much as this homemade caramel corn tastes nice it’s advisable to have it within the limits of balance diet. The popcorn itself is whole grain with fiber and antioxidants while added sugar plus butter on the other side is seen in large amounts thus contributing to excess calories and fat.
Homemade Caramel Corn is Better Than Store-Bought and Here is Why
The ability to control the quality and quantity of ingredients in homemade caramel corn, makes it a much fresher and more flavorsome snack than those bought from stores. Besides, a homemade caramel corn can also be tailored as per your preferences; you may opt to add some toppings and mix-ins that you prefer for a uniquely personalized snack.
Conclusion
Homemade caramel corn is an easy-to-make treat with a combination of sweetness and crispiness in every bite. You will just need some basic kitchen equipment plus some simple ingredients to come up with this delicious nibble that can be enjoyed on various occasions. If you have a sweet tooth or are planning on having people over at your place, then homemade caramel corn should do the trick.
FAQs
Is homemade caramel corn hard to make?
No way! When having all the right ingredients and equipment at hand, making homemade caramel corn is quite straightforward since it only requires several easy steps.
How long will homemade caramel corn last?
Store your homemade caramel corn in an air-tight container at room temperature for two weeks or freeze for three months.
Can I include nuts or other toppings while preparing my own caramel popcorn?
Yes! In order to fit your personal taste preferences, you can always feel free to include nuts, chocolate or other toppings when making your own mix of popcorn under heat.
Make caramel corn by yourself in an innovative way, by adding nuts, chocolate and other ingredients you like.
Is it possible to use microwave popcorn in place of kernels I have to pop myself?
You can still use the microwave popcorn but it is always better to pop your own kernels for best taste and texture.
Can I make vegan or dairy-free caramel corn?
Yes! You can easily make vegan or dairy free caramel corn by using non-dairy butter and excluding the other milk-based components. Just replace with your favorite non-dairy alternatives for a delightful vegan bite.
Ingredients:
1/2 cup (1 stick) unsalted butter
1 cup packed light brown sugar
1/4 cup light corn syrup
1/2 teaspoon salt
1/4 teaspoon baking soda
1/2 teaspoon vanilla extract
Ten cups of popped corn (about a one-half cup unpopped corn).
Instructions:
Preheat Oven and Prepare Baking Sheet: Preheat oven to 250°F (120°C). Line a large baking sheet with parchment paper or a silicone baking mat. Set aside.
Prepare Popcorn: Pop your favorite method of making popcorn. You can use an air popper, stovetop popcorn maker, or microwave. Transfer the popped popcorn to a large mixing bowl, removing any unpopped kernels.
Make Caramel Sauce: In a medium saucepan, melt the butter over medium heat. Stir in the brown sugar,
Add Some Baking Soda and Vanilla: Remove the pan from heat and cautiously stir in the baking soda and vanilla extract. The mixture will bubble up, so be careful.
Cover Popcorn: Pour the caramel sauce over the popped popcorn in the mixing bowl. Use a spatula or wooden spoon to lightly toss the popcorn until it is well coated with caramel sauce.
Bake: Spread out onto your greased baking sheet then put this into an oven for 45-60 minutes that has been preheated; stirring every 15 minutes so that it cooks evenly, or until caramel coating hardens.
Cool It Down and Separate: Remove it from your oven and let it cool down on this pan. When cooled off, break any large chunks of caramel corn into bitesize pieces.
Serve or Keep: Serve homemade caramel corn right away or transfer to an airtight container to keep. For optimal flavor and texture, consume within a week or two.
Important Note: Be very careful with hot caramel as it can cause burns. Avoid touching the melted caramel directly with your hands until it has cooled completely.
Enjoy Your Delicious Homemade Caramel Corn As A Sweet And Crunchy Snack For Any Occasion!
